Showing posts with label 요리법. Show all posts

Tuesday, August 24, 2010

Mandoo (만두)

Mandoo, or mandu (만두), are the Korean equivalent of postickers, gyoza, dumplings, whatever you want to call them.

I learned to make mandoo when I was a small child, practically at my mother's knee. My sister and I loved making mandoo- we were rather girly girls that enjoyed sitting inside, drawing, reading, talking, and cooking. It was kind of a "Little House on the Prairie" childhood, idyllic and calm. We never broke any bones, we rarely got scratches or bruises, and we didn't fight with one another.

Making mandoo, I think, is one of those things (like making jeon) that brought my mother, sister, and me together. We talked, we laughed, we watched animated movies or Korean dramas, and we made mandoo.

We almost always made the dumplings with tofu filling, no meat. I loved them, but asked my mother one day why we didn't use meat. She told me that it was because she didn't want to have to worry about undercooked meat, and I still use that logic today. Plus, since I am alone out here, it takes me three times as long to make mandoo- I don't want to leave raw meat just sitting there while I'm making the dumplings.

I've always used pre-packaged gyoza skins, because they're very convenient and easy. They taste just fine and they're already rolled out and cut into perfect circles- what could be better?

This past weekend, I was at home, sick, and decided that I wanted to make mandoo. I didn't want to leave the house, I was miserably sick, and the urge to make mandoo was overwhelming. So I did what any other insane sick person would do: I made my own mandoo skins. Yes, totally insane.
I prepped the filling first- tofu, Korean chili, and kimchi. The chili and kimchi needs to be minced fine, the tofu needs to be strained and mashed. I threw some fish sauce, soy sauce, and a little sesame oil into the mix, along with a few cloves of minced garlic. (If the vegetables aren't minced fine, they'll poke through the dumpling skins.)
Then came the dough. Easiest thing to do: flour and warm water. Add some water to some flour and stir (I used long chopsticks, but I assume forks or spoons or whatever would work). Keep adding water, a little at a time, until the dough clumps together, as above.
I rolled the dough into logs, snipped the logs into pieces, and then smushed the pieces down to form discs.
The pieces get rolled out thin with a rolling pin. They don't have to be perfect circles, and really, they won't be. The shaping of the dumplings is where the shape comes in handy- some of my skins were oblong, some were almost squarish, but they mostly looked uniform after I had made the dumplings.
I used a wooden spoon to thin out the edges of the roundish shape- the edges get crimped and stuck together, so they should be thinner than the middle. I love this wooden spoon. I have two of them- one in my coffee jar, one for odds and ends like this one. My mother let me bring these spoons to Albuquerque with me.
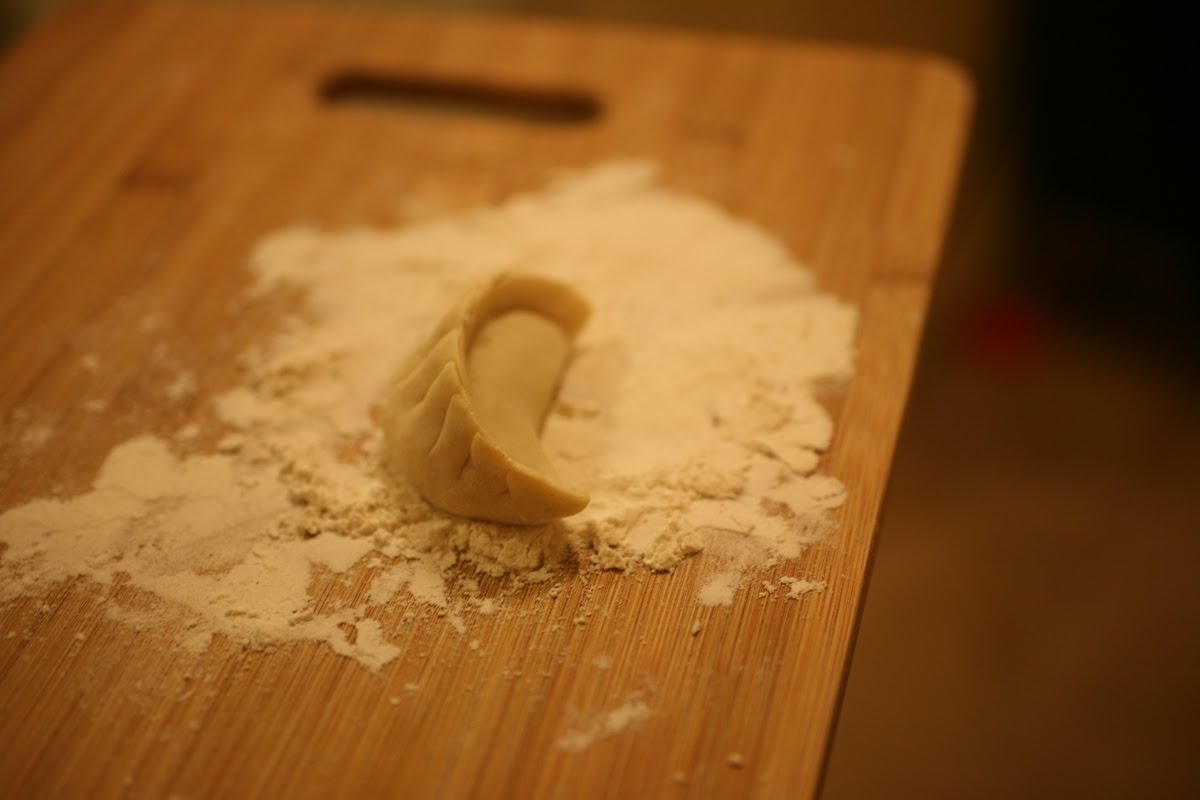
Since I learned to make potstickers as a kid, it's pretty much second nature to me. These skins are totally foreign to me. Pre-packaged gyoza wrappers have no stretch or give AT ALL. These floury things were loose, stretchy, pliable, and totally freaked me out. After about four or five, I got the hang of it. I found that it's easier to crimp just one side of the dumpling (with pre-packaged wrappers, I crimp both sides) and to use the stretch in my favor.
The bottoms get dusted with flour before going onto a sheet tray lined with parchment and heading to the freezer.
A few of the mandoos were destined to be my dinner. I like to pan fry the dumplings all the way around, on all three sides, rather than the more typical method of frying the bottom then steaming. This is also where the no-raw-meat comes in handy, because I can fry all three sides and eat the things without wondering if the meat in the very center has cooked completely or not.

They were delicious. I didn't make very many (maybe 40?), but now that I know how very easy it is to make my own wrappers, this may become a more regular thing that I do (when I have time).

The kimchi filling is really very good if you start with good kimchi. This is important, because kimchi that gets heated up tastes more like itself than it does while cold. Starting with bad kimchi (read: store-bought) just makes it even worse, so I would never do that (I wouldn't buy kimchi in a store anyway).

Being sick really just makes me want to lie in bed and watch crappy movies, so I'm glad that I did something while I was sick. I'm still not feeling great, but better. Work is distracting me- I was at work for 12 hours yesterday, and will probably end up here late tonight, too.

There are photos to post, things to whine about, but no time to do it all. I'll get there, at some point.

Read more...

Monday, August 16, 2010

Vodka Tomato Sauce

I've never had chicken noodle soup when I don't feel well. Generally, if I'm sick, my mother makes me juk (or jook- 죽), this rice porridge-type dish. I like my juk cooked with egg, and I add soy sauce in little dribbles as I eat.

But since my mother is not here, I was on my own. I didn't feel like going shopping for any food, certainly, and I wasn't about to get food delivered (the choices in Albuquerque are not good- pizza and Chinese food, I think), so I looked through my refrigerator and the pantry staples I had around the house. All I could come up with were the ingredients for vodka sauce, that lovely, deceptively simple-looking tomato sauce that works well with strand pasta.


Normally, this sauce is made with cream. Since I only had half-and-half, I heated up the stuff and reduced it by about half, which I reasoned had doubled the fat in the half-and-half, making it pretty close to heavy cream (my logic is flawed, but at least I am able to justify things to myself). I reduced the half-and-half with salt and coarsely cracked pepper in it, figuring that I might as well season it since I was going to be heating it up.


Easy sauce, it takes about half an hour from start to finish (including the chopping of the onion and garlic, and I have pretty terrible knife skills).

Vodka Tomato Sauce
salt and pepper
1 tablespoon olive oil
1 tablespoon butter
1 small to medium onion, diced
3 cloves of garlic, minced
1/2 cup vodka
1 can (28 ounces) tomatoes (chopped or crushed or diced)
1/2 cup heavy cream (or my reduced half-and-half method)

Heat olive oil and butter over medium heat. Add onions, season with salt, and let the onions soften. Once the onions soften a bit, add the garlic. Do not brown the onions or garlic; they should get soft and fragrant. It should take 5 - 10 minutes.

Turn up the heat to medium-high and dump in the vodka, letting it cook out until just a little bit of liquid remains. It should only take about 3 - 5 minutes.

Add the tomatoes and bring up to a bubble, then lower the heat and simmer. After the heat is lowered, blend in a blender or with an immersion blender.

Add salt and pepper to taste. Pour in the heavy cream and bring to a simmer. Sauce is done!

I combine the sauce and cooked pasta, then grate some cheese (usually Parmiggiano, but I only had Pecorino in the house, so I used that) over the whole thing, toss it together, and chuck it all into a bowl.
I use an immersion blender because that's all I have (I have no large kitchen appliances here) and I don't blend it until it's totally smooth. I leave little chunks of tomatoes (I had used chopped tomatoes here, though diced or crushed work equally well) so that I can get a little bit of texture.

Small shavings of cheese (not big, long curls of cheese) bring a lovely, salty bite to punctuate. I love Pecorino.

I really, really love tomato-based pasta sauces with kimchi. I know, it's a little weird- but they work really well together. Yum.

This particular batch of sauce will probably feed me for five or six meals. I don't like a ton of sauce on my pasta, though (the photos above show a lot more sauce that I like; I figured the pictures for this post need to really show the sauce, since that's what I'm talking about), so it may feed a "normal" person only three or four times.

I feel a little better now. Perhaps something about the vodka in the sauce helped me? Oh- and a note about the vodka: I only have citrus infused vodka in my freezer right now, so that's what I used. I couldn't detect any weirdness about the finished sauce, though it smelled fragrantly lemon-y when the vodka was simmering away (vodka and butter smell delicious together). I also have to be honest- I probably used a little more than half a cup of vodka, since I glugged it into the saucepan.

Since I live at a higher altitude, I have to use a slightly higher heat and cook things for a couple extra minutes to get food just about right. At some point, I'll write another post about that- the weird issues of having to cook at a mile high. Another time, after I'm done with this entire pot full of vodka tomato sauce.

Read more...

Wednesday, August 11, 2010

Jangjorim (장조림)

It has been a completely nutty week so far. Work is ... chaotic. This always happens right when filming ends, and filming just ended. So now is when things change and adjust and go crazy before everything settles back down.

I cannot wait for things to settle down.

Plus, there is this person at work ... oy gevalt! I touched on this briefly before, but it's getting worse. I can't even look at this particular co-worker anymore, it's making me that crazy. When faced with incompetence and someone with an inability to even realize that they are incompetent, I just stop talking to that person. They're not doing their job anyway, what do I have to discuss with them? All they want to talk about is their personal life or their plans for this weekend or whatever. I have no time for that nonsense, I have business to attend to.

Mean, yes. But very, very true, especially in a business where time is (literally) money. I don't tolerate fools or laziness well.

Sorry, tangent- I needed to vent. Onward!

A couple weeks ago, I was craving jangjorim (장조림), which I would consider a braise. "Jang (장)" is, I think, representative of "ganjang" 간장)," which is the Korean word for soy sauce. And "jorim (조림)" means braise or simmer or whatever. So it's a method of cooking, not really this specific dish.

I've seen jangjorim with peppers (small green Korean chilies, usually), without eggs, without meat, in an endless variety. Some people make their jangjorim quite sweet, while others make theirs quite salty, and yet others make theirs very mild.

I'm of the "salty" and "strong" persuasion. My mother's jangjorim is not quite as strongly salty, and she usually adds chilies. I cannot find Korean chilies here, so my compromise was to add lotus root (연근), which is traditionally made in a slightly sweeter version than this.

Jangjorim generally refers to a side dish (banchan, 반찬) of meat and eggs, simmered until the connective tissues of the meat (usually a tough cut) melt into mush, and the meat falls apart in slivers, like pot roast. I usually add garlic, but didn't this time because I was lazy. This is a very forgiving dish, it doesn't mind a little push and pull.

Soak the meat (in this case, 1 pound of lean stew meat purchased at Keller's, my local family-owned butcher shop and grocery store) in cold water. I do this in the pot that I will be cooking the dish in, and I change the water after ten minutes. I leave for another ten minutes, then pour out the water, refill with fresh water, and bring to a simmer.

Soaking the meat will cause the blood to come out of the meat and ... I don't know, soften it? Those "ten minute" estimates are just estimates. I am generally doing other things- cleaning, working, watching TV, something- and I change the water when I remember to. I don't use a timer or anything.
Boil the eggs. My method to boiling eggs is simple: eggs into pot, cover with cold water (as you can see, I didn't cover the eggs all the way, because if I did, they would float), bring to boil over medium-high heat (not high heat!). As soon as the eggs come to a boil, I put the lid on the pot and turn off the heat. Leaving the eggs for about 4 - 8 minutes would yield soft yolks. I leave mine for 10 - 15 minutes, or until I remember them.

I like boiling eggs this way because the yolks don't get that gray band around them, they stay nice and yellow. Much more appetizing that way.

Run the eggs under cold water to cool them, then peel off their little shells. I had issues getting the peels off cleanly, which my dad says is because I didn't completely cool the eggs. I'll try getting them totally cooled before I peel next time; hopefully, that will help.

I peeled the eggs, then added them to the pot with the beef and water.
I saw packs of lotus roots at the Korean market the last time I went, and I couldn't resist them. Because I never see Korean food here, I have odd cravings. I've taken Korean food for granted all my life, and I can't do that here. These seemed so very Korean, I had to get them, even though I've never cooked with them before.

Lotus roots are generally cooked in jorims in Korean cooking, but a little sweeter than jangjorim. I was fully prepared to make them the traditional way, but when I started making jangjorim, the lotus roots peered at me from the refrigerator. I decided to just throw 'em in (well, half the package, anyway).
Rinse the lotus roots. I leave them to drain a bit, but extra water doesn't hurt this dish, so it doesn't really matter. Add to the pot.
Once the beef, eggs, lotus roots, and water are at a simmer, I added soy sauce (maybe around 1/3 cup?), a little dash of fish sauce, and a shot of vinegar (I used apple vinegar, for fun). A word about the vinegar- I add it because I like tang and kick. If you wanted very dark eggs and lotus roots, opt away from the vinegar, as it tends to inhibit color bleeding. (This is a good trick for black clothing, which I own a lot of- a soak in water with a bit of white distilled vinegar will keep clothes blacker for longer).

Bring to a boil over medium-high heat. Doing this over high heat makes everything too volatile- the eggs crack, the beef and lotus roots break apart- so a lower heat is better, I think.

Even with the lean beef, there will be scum (see it, above?). I skim off the scum, trying not to take away too much of the water.
Skimmed. See how sad my eggs are? I am a bad hard-boiled egg peeler, I guess. I simmer the heck out of this pot. I'll put a lid on it, but slightly askew, so that there's a way for the steam to escape, then simmer simmer simmer.

I think I simmered this particular batch for about three hours at quite low heat. Yes, I am not kidding about the simmering. I taste as I go, because the beef and lotus roots will flavor the liquid. Once the liquid's nice and beefy and rooty, I'm done simmering. This time, it took three hours. If the liquid level drops too much, add more water (I probably added a little bit of water twice).

I like to cook jangjorim to death because I want that soy sauce flavor to go all through the eggs and meat. Japanese soy sauce eggs have very white whites because they are simmered for a very short time. That's all well and fine, but I want the whites of my eggs to be quite brown, then blend slowly into white.

I really like packing jangjorim for lunch, when I take my lunch to work, and that means that I don't take any of the liquid along- I just put an egg, some beef, and a few slices of lotus root on top of my rice. If everything's not very well flavored, I'll end up eating a very bland lunch, and who wants that?
There's still quite a lot of grease in the post, as you can see from the pretty shiny circles on the surface of the liquid. From experience, I have to say that this isn't the type of grease that will congeal when it cools. It just stays. I don't have one of those fat separator things, so I tried something I never tried before.

First, I fished out the beef, eggs, and lotus roots and put them into a smaller pot. Then I whipped out some crazy replacements for cheesecloth.
This blue and white thing is my coffee dripper contraption. My mother's youngest brother, who is an artist in Korea, made it. I kidnapped it when I was there earlier this year, and it is my best friend when I am in caffeine withdrawal mode. Obviously, it has a rather small base, so I propped it up on chopsticks to hold it in place.

I poured the liquid through the coffee filter, and it worked pretty well! Some scummy stuff and some of the oil stayed stuck to the filter, and the liquid that made it into the pot was pretty much clear. (See my sad broken eggs?)

I like this trick, as it's easy to clean up (washing cheesecloth is horrible). I heated up this smaller pot, just for safety's sake, and then let it cool before throwing everything into containers and refrigerating.
I rather love jangjorim. I always have, ever since I was a kid. The beef becomes string-cheese-y, falling into strips, and I love that texture. I eat string cheese one string at a time (yes, I am totally that person), and jangjorim is just the same.

The lotus roots were surprisingly good like this. When braised like this, they have a texture somewhere between a radish and a potato, with a nice briny flavor. I found that my ratios were not quite right- I needed one or two more eggs and probably the entire package of lotus roots- but that's always a tough thing to estimate.

I especially love jangjorim cold. It's one of those things that can be eaten in the summer, refreshingly cold, with a little rice, some kimchi, and some mook (or muk, 묵), which is dipped into the chilly, salty liquid of the jangjorim. That's been my dinner for the past few nights, and it makes me nostalgic for my family, for Koreatown, and for having Koreans around me.

I'll be making jangjorim again soon, I'm sure. With less mutilated eggs from now on!

Read more...

Thursday, December 31, 2009

Apple Pie

I am so late with this post.

My work laptop, a.k.a. my lifeblood, decided to die a sudden and inexplicable death while I was in Santa Maria for work. Not only did the thing die, it died on the first (of two) days that I was going to be away from LA. I was distressed, needless to say.

After much hullabalooing and ballyhooing and sobbing, I got a new laptop yesterday. Thank goodness for roaming profiles, or I would have been extraordinarily upset.

(And that concludes the nerdy section of this entry.)

Not only did my beastly computer decide to snub its filthy nose at me, but my schedule! It has gotten completely out of control. These things happen, of course- the last show was no exception. It seems to be a little more intense on this film- between the high expectations, the dizzying feat of having to make something worthy of Tim Burton, and the scope of work, it's a lot of do.

We'll get through; we always do.

For now, so I don't have to think too hard, here's the apple pie recipe that I used on Christmas:

This pie is beloved by everyone but my sister! It was a hit last year, the first year I made it. Then I lost (!) the recipe, so this year, I tried a new one, from Paula Deen, since her pumpkin pie recipe has never failed me (well, after I tweak the amount of spices and canned pumpkin, that is).

This apple pie is a great first pie to make, I think, because it's ridiculously easy- even easier than the pumpkin pie, really! It's messier to make and a bit of a pain, what with the lattice crust on top, but the actual assembling of the filling is very quick, with very few ingredients.


Apple Pie
adapted from Paul Deen

3/4 cup sugar
1 tablespoon all-purpose flour
2 teaspoons ground cinnamon
Dash of salt
4 - 4 1/2 cups peeled, chopped cooking apples (I slice rather than chop)
1 16-ounce jar of applesauce
2 tablespoons lemon juice
2 tablespoons of butter, cut into small pieces
pie crust


The dry ingredients, measured out and waiting to be whisked together. Okay, honestly, I didn't use a whisk. I used a fork. Sometimes, I can't be bothered with a whisk.

Applesauce plus spices and sugar? Delicious! It really is good- I smeared some on my hand (accidentally!) and tasted it. I used unsweetened all-natural applesauce, because this pie does not need any more sugar in it.

Apples- I used one Jonagold, one Yellow Delicious, and two Granny Smiths. Maybe I added a third Granny Smith, I don't remember anymore. I also snack while I slice, so who knows how much of the apple actually makes it into the pie.

I like to peel the apple and then slice them into thin wedges. I don't chop them as suggested in Paula's recipe, because I, being the strange obsessive-compulsive person that I am, like to place each apple slice into the pie crust. That way, I get more apples into each pie. Seriously.

The pie, after I've wedged every single slice of apple into it. I take a little bit of the leftover applesauce mixture and dollop into the empty spaces, but using sliced apples eliminates the big gaping holes in the pie that chopped apples would yield.

I usually cut up the butter as I peel the apples and then put the butter in the fridge. I take out the butter just before I need it. Butter melts so quickly that I don't feel the need to let it come to room temperature. Plus, I like to use the knife once and be done with it.

I didn't make my own pie crust, don't be silly. I bought one pie crust in the tin and then I bought another pie crust that's sold without the tin, rolled up. I slice the non-tinned crust and arrange it in a lattice. As you can see, I rather like the crust that's on top of the pie, so I leave the lattice quite wide.

Sometimes, I sprinkle sugar on the top. Sometimes, I go crazy and brush egg white onto the top crust (leftover from pumpkin pie) and then sprinkle with sugar. This time, I was lazy and left it plain. I cannot figure out how to prevent my lattice from cracking, and I've pretty much decided that I don't care. It's still delicious!

There's always leftover pie crust from the lattice, and there's always leftover applesauce mixture from the filling. I always slice up another apple (Granny Smith this time), smear it around in the leftover applesauce mixture, and then make a little cobbler-type thing. My sister made the leaf shapes- I usually just chop up the crust and press onto the apples.
Yum. This is devoured first, as it's very thin and so it cools very fast.

And this concludes my blog for 2009.

It's been a zany year, but I'm too busy to reflect back on it! After this movie's done, I'll dwell a bit and see where I'm at.

Happy eating!

Read more...

Saturday, December 26, 2009

Pumpkin Pie

Back at work today. There's nothing like working the day after Christmas, especially when that day happens to be a Saturday and the rest of the world is all snug and warm, with no prospects of leaving their homes. Sigh.

I did say I would post about food, so here it is. Pumpkin pie, a.k.a. the only thing my sister loves that I bake. She really loves pumpkin pie. It's funny and also touching, because I love it when people, particularly family members, enjoy what I make for them.

My cousin also likes pie, but he prefers the apple pie to the pumpkin (recipe coming tomorrow or Monday- let's be realistic, how likely is it that I'll get two recipes up in two days??). He loves apple pie, we've all discovered. Hooray for all-American desserts!

I've been using this pumpkin pie recipe for years. I love it because it has cream cheese in it and it's fairly easy to whip together. It requires a bit of fussiness (I consider separating eggs and having leftovers halves of eggs to be fussy) and the baking time seems to fluctuate rather wildly- sometimes, the required 50 minutes will do it. Other times, I have to let the thing bake for up to an hour and a half! I don't know what's causing the strange variations, but I don't mind. Easy, easy pie.


Pumpkin Pie
adapted from Paula Deen

1 8-ounce package of cream cheese, softened to about room temperature
2 1/4 cups of canned pumpkin, mashed
1 cup sugar (I use a scant cup)
1/4 teaspoon salt
1 egg plus 2 egg yolks, slightly beaten
1 cup half-and-half
1/4 cup (1/2 stick) butter, melted
1 teaspoon vanilla extract
1 1/2 teaspoons ground cinnamon
1/4 teaspoon ground ginger
Pie dough (this makes enough for 1 deep-dish pie)

Preheat the oven to 350 degrees.

If you make your own dough or buy dough that is sold by itself, without the aluminum pie plate, prepare the crust, pressing into the pie dish. Do what you normally would, freezing the pie crust and then par-baking it- I use frozen pie crust from the store and let it thaw out while I mix together the filling. I don't have time to be making pie crust.

In a large mixing bowl, beat the cream cheese with a hand mixer. Add the pumpkin and beat until combined. Add the sugar and salt and beat until combined.


In a separate bowl, beat together the eggs, half-and-half, and melted butter (make sure the butter's not hot or it will cook the eggs). Add the egg mixture to the pumpkin mixture and beat until combined.

Add the vanilla, cinnamon, and ginger, then beat one final time.

Pour the filling into the pie crust and bake for 50 minutes, or until the center is set. I place the pie on a cookie sheet and test the center by shaking the entire cookie sheet. If the center jiggles, it's not set. The edges will set faster than the center, so make sure to check the center.

Cool on a wire rack. Cut into pieces and serve alone, or with ice cream, whipped cream, or, my sister's favorite, Cool Whip that's been frozen.

Deliciously pumpkin-y and not too heavy, even with the cream cheese. This pie will be made in my family for many more years to come, I'm sure.

Happy Boxing Day!

Read more...

Friday, December 18, 2009

Comfort and Joy

Why, yes, I did title this post "Comfort and Joy." Because kale, like nothing else, brings me great comfort. I've been prattling on and on about kale lately. I vaguely recall a time in my life when I did not know what kale was ... but I don't know what I would be eating now if not kale.

Oddly, despite all the fancy-schmancy designer grocery stores near me (*ahem* Whole Foods *ahem*), I cannot find dinosaur kale (lacinato kale). I'm sure I could find it at the Culver City Farmer's Market, which is about a block and a half away from my work, but the market shuts down at 7:00. 7:00, internet, is when I am just beginning to see a glimmer of light at the end of the tunnel that is my day. So there's no way I can frequent the ol' farmer's market, which means that it's all curly kale all the time for me.


Not a bad thing, of course. I love curly kale. It's lovely and delicious and soothing and earthy and somehow just plain good in the most simple, bare-bones way possible.

My go-to winter dinner when I'm cold and tired and need a distraction is cooked kale. Sometimes I like it in a ratatouille-type dish, with eggplant and bell pepper and onions, a tin of diced tomatoes, and maybe some cheeeese. Other times, I like it very quickly. That involves nothing more than a few vegetables, a tiny sip of oil, and a pan.

Quick Vegetable Braise

1 bunch kale
1/2 onion
1/8 head of cabbage
1 small zucchini
oil, about 1 tablespoon (I used vegetable)
salt
water

I prep all the vegetables first, before heating up the pan, because kale can be a bit time-consuming to clean and chop. I give the entire bunch a quick rinse, then chop out the stem and coarsely run my knife through the leaves. In ratatouille-type stews, I chop up the stems and use them, cooking them far longer than I cook the leaves. After I get the kale chopped up, I wash it. Much easier to chop and wash than to try to wash big, curly leaves of kale thoroughly.

I sliced the cabbage, onion, and zucchini into roughly the same lengths, the zucchini staying thicker than the cabbage or onion. I usually start heating about a tablespoon of vegetable oil in a pan while I'm chopping up the easy-to-clean vegetables, just after the kale's been washed. I use vegetable oil because I can really taste olive oil, and I don't like olives. For me, olive oil is fine to use for foods that will overpower the olive-y essence of the oil. In this particular dish, I can taste the olives too much and I don't like it.

Onions first, of course. I love softened onions, expound their virtues, and don't like onions in any other way (perhaps maybe in onion rings). I salt them (with garlic salt) as soon as they're in the pan so that their juices give and they start turning limp and translucent.

Zucchini go in when the onions are about halfway cooked (so, halfway to mushiness galore). A little Lawry's seasoning salt and a little sauteing fun. The cabbage goes in shortly after the zucchini. When things are getting a touch softer, just a few minutes later, I add a little bit of water.

Not much- it doesn't even come halfway up the side of a zucchini matchstick. Just a little bit, because kale needs the moisture. Once the water's a bit hot, a minute or two later, I add the kale.

Delicious. I just let it cook and cook and cook, stirring every now and then, until the kale has relaxed into slippy little tendrils of green goodness. Lovely and good and healthy, too! I love kale.

... Wait. Have I mentioned that I love kale??

p.s. This weekend and the beginning of next week are going to be a zoo. I have a movie to work on, and it comes out in less than three months (!). Plus, next Friday is Christmas (!!!!!!!) and I'm not ready.

Read more...

Thursday, December 17, 2009

Granola

I'm exhausted. Really, I am. It's all my fault, of course, because I don't sleep when I have the opportunity to and I generally stay up until all hours of the night, fretting about work. It's what I do, and it's part of what makes me good at my job.

The trip to Santa Maria for work wasn't necessarily tiring because of the travel, it was tiring because being in a new place, surrounded by new people, having to get used to a new building and new methods? That's tiring. I was on edge and wired all of Monday and Tuesday and got by on adrenaline until about midday yesterday, when I just sort of collapsed into a heap in the screening room and let my brain shut down for a much-needed fifteen minute break.

It says a lot about how focused I was on work that the only photo I took of the hotel was of my granola.


And this with my phone, not even with a proper camera. I remembered thinking while I was having it that I should take a picture for when I blog about the recipe to make this granola, which I find is great for breakfast with a cup of low or nonfat plain yogurt. I really like Greek-style plain yogurt, and I don't like sweetened yogurts at all, so I need a little something to boost up my yogurt when I eat it. This granola is great- not too sweet (not very sweet at all, really), crisp, flavorful, and delicious.

Granola
adapted from Nigella Lawson's granola in "Feast"

Dry:
5 cups rolled oats
1 cup sesame seeds (I used black sesame seeds, of course you can use white)
1/2 walnut halves
1/2 cup pecan halves
1 1/3 cups slivered, blanched almonds
2 teaspoons ground cinnamon
1 teaspoon ground ginger

Wet:
1 cup applesauce, unsweetened
1/2 cup maple syrup (I used grade B)
1 tablespoon canola oil (or vegetable oil)

Add-on's:
Mini chocolate chips
Raisins
Dried cranberries

Very simple, this one:

Preheat the oven to 350 degrees.

Stir the wet ingredients together in a bowl, preferably with a beloved spoon from childhood memories.

Measure out all the dry ingredients and dump into a large mixing bowl. Mix them all up so that the cinnamon and ginger are dispersed.

Combine wet ingredients with dry ingredients, stirring with a rubber spatula to coat everything as well as you can. Divide the ingredients in half, pressing onto two rimmed baking sheets, spreading out the mix evenly.

Bake in the oven for a total of 40 - 50 minutes, stirring every 10 minutes. I stir the granola and swap out the cookie sheets, so that what was on the top rack is now on the bottom and vice versa. I also turn the racks, so the left side is now on the right side. I'm very weird about that kind of thing.

Take the granola out and let cool. Contemplate what to add to the granola as you wait. I added half a cup of mini semi-sweet chocolate chips to the jar that I knew that I would put half the granola in.

I dumped the chocolate chips onto the cooled granola and mixed around, then put the mixture into my jar.

The other half of the granola, on the other baking sheet, was poured into a freezer bag, plain. I like some plain, some flavored. I've been eating the plain granola with yogurt and prunes.

But the morning after I made the granola, I had the plain one with a cup of Fage yogurt. It was delicious.

A word of warning about this, though- it really is very, very unsweetened. The original recipe calls for honey and brown sugar, I believe, whereas I just put in a very insignificant amount of maple syrup. I don't like very sweet food for breakfast, never have, so I'm never going to go full-sugar on my granola. Maybe add half a cup of brown sugar to the above recipe to appease the inner sugar-craving child?

Time to get some more work done before I go to sleep, too exhausted to think coherently (much less type out recipes!).

Read more...

Tuesday, December 08, 2009

Stuffed Bell Peppers

I almost made it one whole week without posting a recipe. That's right, I'm not counting the one post about food between this one and the streusel cake. That post was more about my family than it was about food, methinks.

This post has an actual recipe, with real measurements and whatnot. I didn't riff off another recipe or even do a search on epicurious.com to find any sort of guidelines. I went to the store, saw some lovely red bell peppers, and decided that I was going to wing it. In the spirit of winging it, my measurements are from memory, not from fastidious measuring while cooking.

Turned out quite well, actually (pats self on back), but would have been better with a hearty green, like kale or mustard greens, perhaps even collard greens. Next time, definitely adding in something green. Even if it is just frozen peas. Yum.

Stuffed Bell Peppers

Serves 4

4 bell peppers (any color)
Oil spray or a bit of oil for greasing, preferably vegetable or canola
Glug of oil, vegetable or olive
3/4 pound ground turkey
Salt
Pepper
1 onion, diced
1 can (14.5 ounces, I think?) diced tomatoes
3/4 cup cooked or par-cooked rice (햇반)
1/3 cup or so shredded hard cheese (Parmesan and Romano for me)

Very easy, this dish, so easy that I never remember how to make it. Every single time I think, 'stuffed peppers would be nice,' I make them a different way. This time, I made them because I really wanted something comforting and warm and filling. Like pasta, but not pasta. If that makes sense.

Preheat the oven to 350 degrees. Spray a baking dish with some sort of cooking spray or grease with oil (NOT butter).

Wash and trim the bell peppers, removing the seeds. I cut the peppers into three rings, the last ring being more of a cup, since it was the bottom of the pepper. I don't feel the need to slice in half and keep all the pieces looking like a cup unless it's a very runny filling, which this is certainly not- the cheese and turkey keep the filling and pepper very much together. Place the bell pepper rings on the prepared baking dish.

Heat oil in a skillet that's large enough for all the ingredients except the peppers. I used nonstick because I love nonstick. Cook the turkey. Note that I write "cook," not "brown." Turkey has no fat in it (or maybe it's 2% fat?) so it doesn't really brown the way beef does. It chars. And I don't like burnt turkey, it's just not appetizing. Add some salt and pepper.

Once the turkey is about halfway cooked, add the onions and stir. I like very well-cooked onions- I don't eat raw onions at all, not even in salads or sandwiches, and I usually cook my onions to mush. If you like raw onions, just cook the turkey by itself and add the onion in later (though I think the onion juices help the turkey). Season with salt and pepper (I used some Lawry's seasoning salt here).

(If I was going to add kale, I would do it just after the onions have released some of their juices.)

Saute away until everything's cooked. Turn off the heat and add the can of tomatoes, juices and all. Stir to combine. Sneak a taste and see if it needs anything. Stir in the rice. Let this cool a bit, if you have the time- it's not necessary, though, just helps because the cheese won't melt, which helps in getting the filling into the peppers. Stir in the cheese, reserving a bit for the topping.


Spoon the mixture into the bell peppers, top with the remaining cheese. Loosely cover the baking dish with aluminum foil and bake for 20 minutes. Take off the foil and bake for an additional 10 - 15 minutes, or until the cheese is melted and brown and the peppers are yielding.

I like slightly firm peppers, and 30 minutes in the oven gives me the texture I want. I know some people like raw peppers, so as long as the filling's completely cooked, it can stay in the oven just long enough for the peppers to heat and the cheese to melt, probably ten minutes. On the other hand, for people that like very mushy peppers, leave the foil on and bake for a longer period of time, then take the foil off just for the last 10 minutes.

Easy and delicious. And the potatoes, little baby Yukon golds, were a total cheat. I love potatoes but I hate how long they take to cook. This is my cheat, which I've been using for years: wash the potatoes very well. While they're still a bit wet, wrap them in plastic wrap. Take a sharp paring knife and stab the potato a few times. Put the plastic-wrapped potato in the microwave and nuke it.

I find that a medium Russet takes about 5 minutes until cooked through but not fall-apart-mush. These baby Yukons were microwaved for three minutes (individually wrapped but cooked at the same time) and they were a little too squishy for me. Still delicious, but I like my veggies with a little bite (terrible picture- the lights in my house are very dim).

As for the peppers- I only bought two peppers. The filling pictured in the first photo is what was leftover. I find that these taste better if the peppers are baked right before eating. Peppers that get baked and then refrigerated and then re-heated are kind of gross.

Perhaps I should explain about that 햇반 (pronounced 'heht-bahn' or something like that) up there in the list of ingredients. These are individually packaged pre-cooked containers of rice for the lazy person or the person that doesn't have a rice cooker. I used one package, which I think is 3/4 cup or so, but it might be 1 cup.

The lid is peeled back a little bit (there is a line printed on it to tell you when to stop) and then the contraption goes into the microwave for two minutes. I didn't microwave for this recipe, I just opened and scooped. I figured that it would be in the oven for half an hour, it didn't need to precook in the microwave- and I was right!

If I had been at my mother's house, the land of always-available-fresh-rice-cooker rice, I would have used that. But alas, I was in my own house of laziness and convenience. So microwaveable packages of rice it is!

On a completely unrelated note, Christmas shopping has been a beast this year. I don't leave work until after stores are closed, so I've been using Amazon quite heavily. It's very annoying, though, and I get charged like crazy for shipping (really, every single vendor is going to charge me how much??) and it's just generally making me want to skip the entire present-giving ritual this year.

Makes me want to skip most Christmas rituals- the thought of Christmas baking leaves me quite cold. I'm sure I'll enjoy it once I get to it ... but that's only if I ever get to it. I can't believe it's already December, much less December 8. Christmas is only two and a half weeks away!

Read more...